Minnows are quite popular and useful as living bait to help trap bigger fish. They are also easy targets since they like to gather in shallow waters close to areas like:
the shoreline
around tree roots
rocks
Here are some types of traps to consider. They can be home-made or store-bought, depending on your needs.
Design
Some traps may feature materials like:
Netting
Mesh
Steel
Galvanize
Vinyl
Polyethylene
Shape
Their shapes may include:
Funnels
Cones
Rectangles
Cylinders
Features
Cone-shape minnow traps come with sloping openings to allow easy access inside the trap.
Torpedo-style traps come in two pieces with hinge openings in the center of the trap. It makes it easy when setting and removing the bait.If it’s a ready-made trap, you can close off one end and allow only one way in and out.
Ease of use
Some minnow traps are fold-able and easy to carry around and store after use.Some straps have smaller mesh holes that are ideal for smaller fish to help stop them from escaping.
Color
Some may argue that choosing darker colors may help prevent the minnows from bypassing traps with brighter colors.
Baiting Basics
There are a few ways to set the bait inside a minnow trap.
Types of bait
Minnows are usually tiny fish, so small pieces of bait will suffice.Food particles to attract minnows can include:
Live insects
Bread pieces
Tuna
Cornmeal or ears of corn
Bread or cracker crumbs
Cookies
Cottonseed meal
Pieces of saltwater fish
Bacon
Cat or dog food
Peanut butter
Popcorn
Tuna
Setting the bait
If the trap has two halves, open it by sliding the connecting latch or door.
When it’s open, separate the two sides to set up the bait.
- Place the bait in a small mesh bag or old stocking inside the trap.
- Hang the bait with a piece of string from the middle of the trap.
- Push the bait through either end of the funnel.
Placing the trap
Since minnows tend to swim in shallow waters, locate areas where you easily spot them and set your trap in place. You can also look for areas with a good current to help force the minnows in the direction of the food source. Set the trap in moving water, from two feet and more depending on the area.
Anchoring the trap
Most fishers set the traps in water for several hours. Since the trap will launch in moving water, it’s important to help keep it steady from bobbing about. Keep the trap in place underwater by attaching some pieces of string to the trap.
- Loop the string over a piece of wood about half an inch or a rock. The string will help keep it in place and also make it easy to pull the trap up after fishing.
- You can also put a few rocks into the trap to help keep it underwater.
Tying the string
Hold the trap upright and use a strong piece of twine to tie a knot in the right-hand corner of the trap.
Next, use another piece of string and attach it to the bottom of the trap to and onto the side of the first string.
Draw the first piece of string to a rock or piece of wood or onto the dock to hold it in place.
Allow enough room in the string to help lower the trap into the water.
Take the second piece of string and attach it to a heavy object to help keep it in place.
When everything is in place, let it down into the water at least two feet deep.
For larger waters, you can go from between 16 and 20 feet deep.
Positioning the trap
- Let the trap sit close to any tree roots, or rocks. This is where the minnows like to swim and will likely smell the bait and go inside the trap.
- Next, position the opening end of the trap in line with the current and away from the shoreline.
- Let the trap sit for a few hours and check the activity as needed.
Tips and tricks
Most fishing enthusiasts may agree that minnows appear to move toward a source of light. You can hang a light inside the trap by looping it onto a piece of string or plastic tie. Tie the knot off to hold it in place.
Emptying the trap
When minnows appear in the trap, haul it up to shore. Open the trap and pour the catch into a bucket with water.
Making your own minnow trap
If you prefer a cheaper trap, you can make your own at home.
You will need:
2 equal size plastic bottles
Some string
A pair of scissors
A pair of pliers
A low heat
1 carpenter’s nail
A length of rope or twine
Join the bottles together
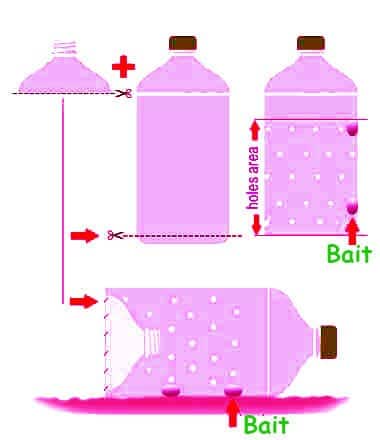
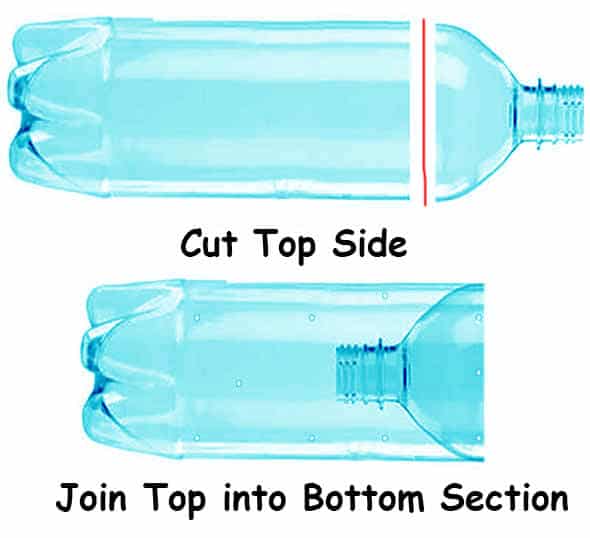
- Cut the end of one of the bottles at the base.
- Take the second bottle and cut around the top end close to the neck area.
- Take the bottle cover from the other bottle.
- Push the second bottle through the opening of the first bottle.
Seal the seams
Hold the carpenter’s nail at between the pliers and heat it on a low flame about half a minute.
Make some holes at least one inch apart around the base of the two bottles.
Sew a seam using a piece of string to hold the seams in place.
Tie off the string ends with a double knot and remove the remaining string.
Set more holes
Use the nail and heat it again to make some holes all over the bottle trap closer to the top.
Connect a line to the bottle with some twine or rope and seal it with a double knot.
Tie the end to a tree or rock close to the water.
Attach it to a heavy object to help the trap to sink.
Set the bait at the bottom of the bottle and give it a shake to settle.
When you’re all set, throw it into the water.
Conclusion
Minnow trapping occurs mainly in the spring months when preparing for the fishing season.Minnow traps are easy to set up, bait and use. You can buy a commercial trap or make your own from recyclable materials around the house.